|
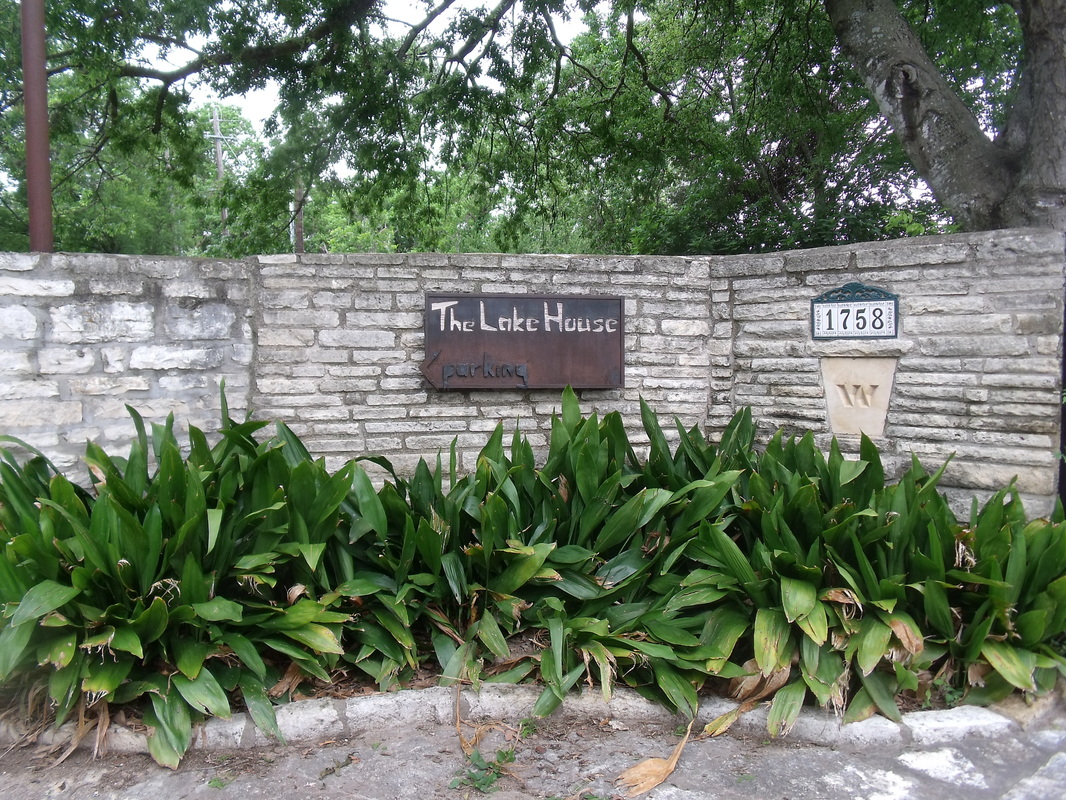
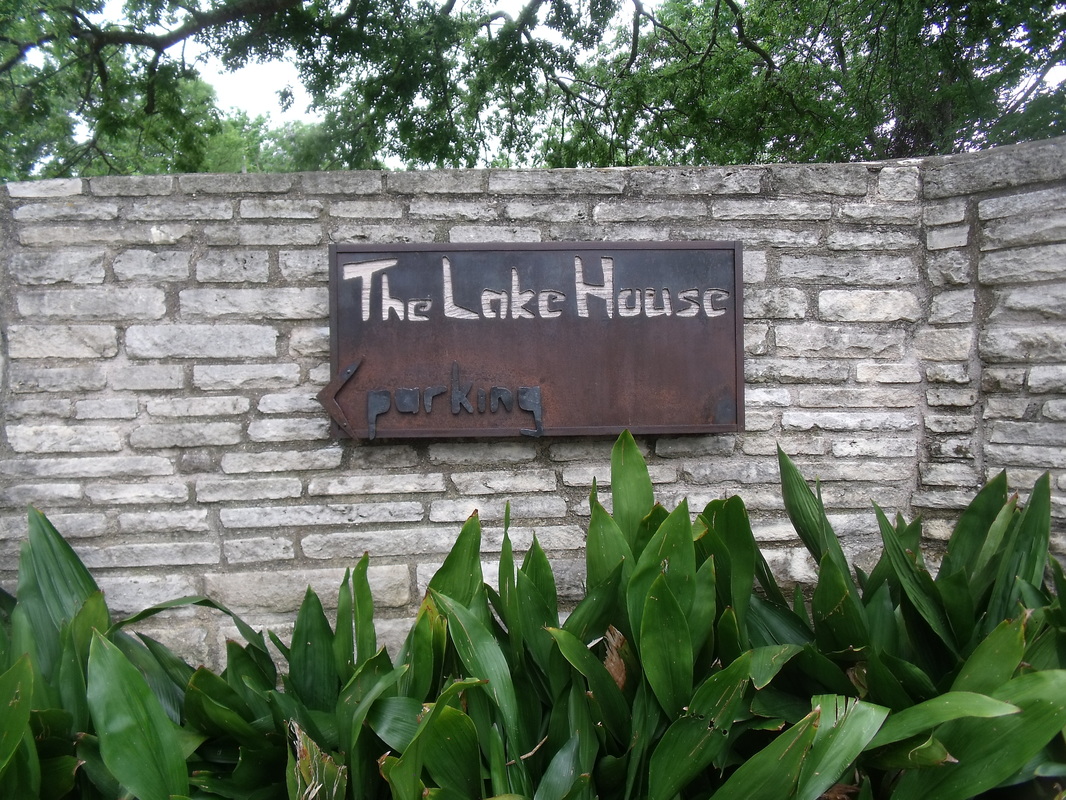
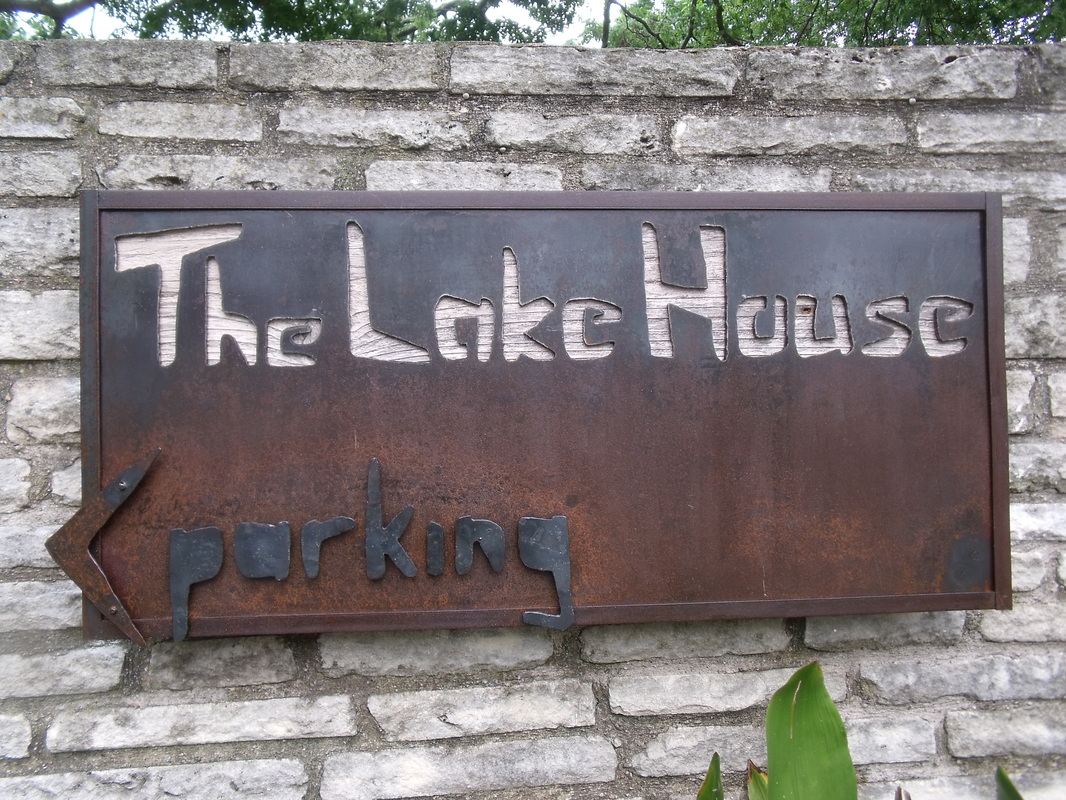
This sign is located in a residential neighborhood. The homeowners have listed the house on HomeAway and wanted a sign letting guests know they'd arrived at their destination.
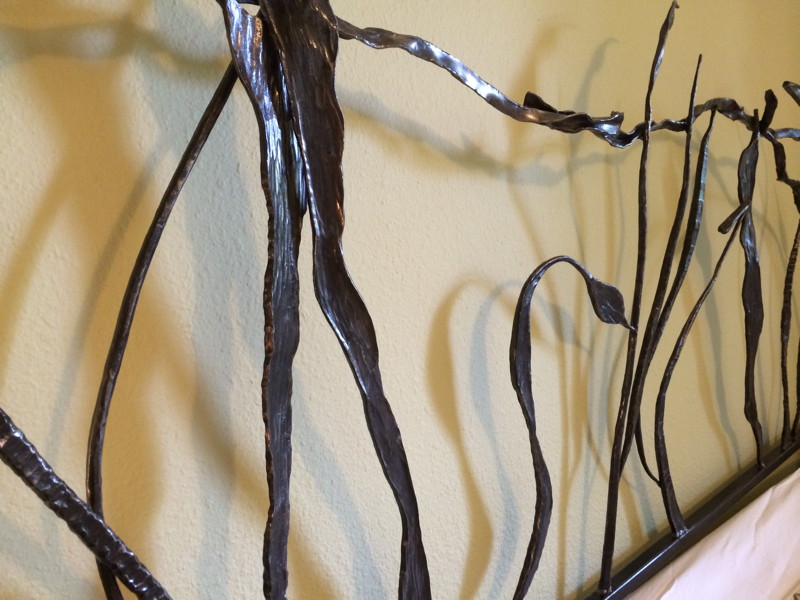
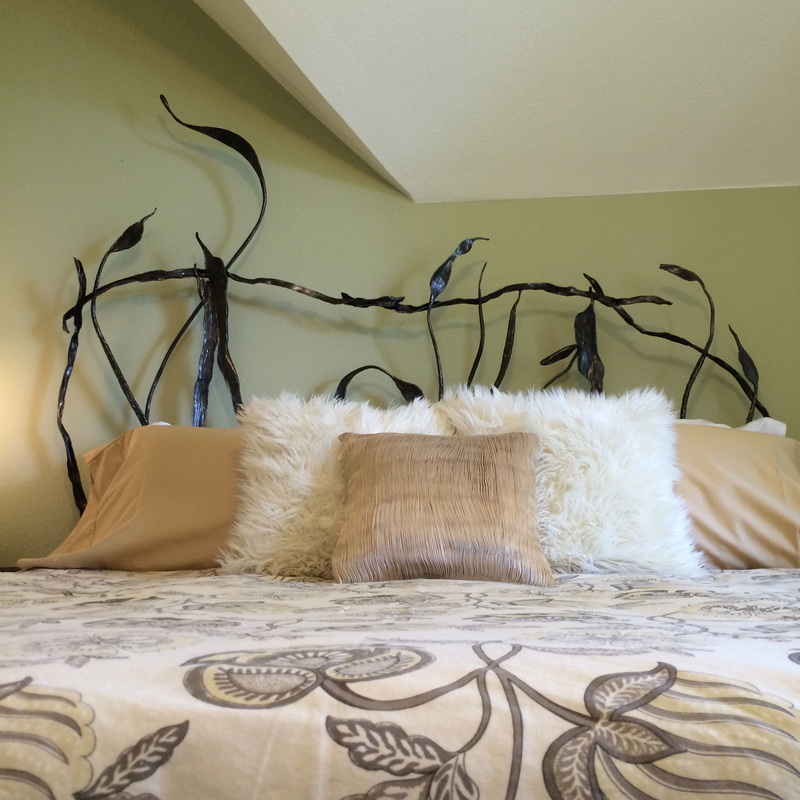
‘The Lake House’ is the description of the house as it is listed on Homeaway. The arrow pointing to the left indicates the lot in which the guests should park. The proprietors of Gateway Guesthouse Bed & Breakfast called me in to design a king size forged headboard as part of a new look for one of the upstairs guest rooms.
The B&B does a brisk business year-round, but a lull in August provided a strategic opportunity for the bedroom makeover. A fairly tight turnaround was needed to have the room redecorated by Labor Day (September), when occupancy kicks into high gear. A daughter commissioned this piece for her mother, whose last name begins with the letter ‘H.’ This custom forged ‘H’ was to be hung on the tile backsplash behind the kitchen stove. Stylistically, the new piece needed to complement an existing kitchen light fixture with a half-penny snub end scroll design.
When designing this piece, I included collaring and a variety of scrolls for visual interest. Disclaimer!: I tend to make my own versions of established scrolls/elements. I’m more interested in the flowing form and shape of the elements, rather than producing exact replicas of traditional scroll work. The ‘traditional’ scrolls that served as inspiration for this piece, however, are as follows: half-penny snub end scroll, fishtail scroll, flared/beveled scroll. And whatever the name is of the scroll with that little ball on the end. The forged letter ‘H’ started off life as 1/2”-square steel bar. A power hammer was used, along with a good ol’ hammer and anvil, to shape the steel. Flat dies on the power hammer were used in conjunction with a fuller for spreading. The fuller left behind that nice texture you see there on the steel. I sealed the piece with paste wax, buffing it by hand to a nice shine. I installed the ‘H’ on the backsplash in the Horseshoe Bay, TX, kitchen. The final dimensions of the letter are 18” tall x 14 wide x 1.5” deep. 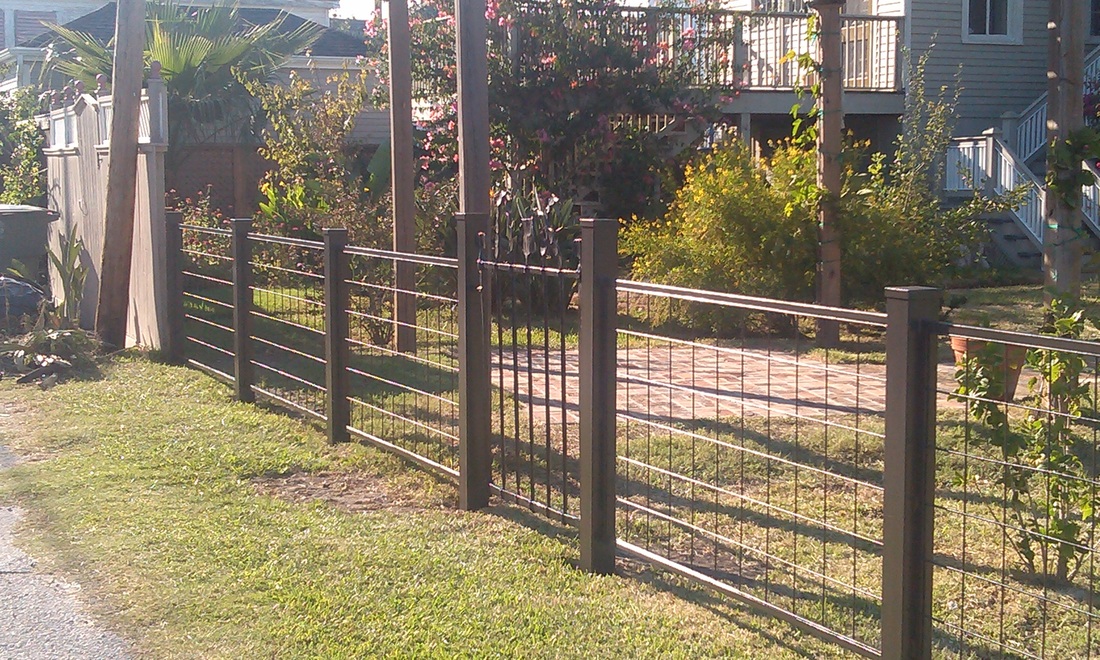  This garden gate and fence grace the back yard of a Galveston, TX, home in the East End Historic District.
The garden gate has been discussed in a previous ‘Musing’ (from May 8, 2012). I designed and built the fence panels to compliment the gate. Mike Landry, one helluva character and a BOI*, assisted me in the installation. (* ‘BOI’ means ‘born on the island’.) The blacksmithed gate was sealed with a U/V-resistant lacquer, allowing the beauty of the hand-forging to show through. To blend in with the garden gate, I painted the fence panels and posts a sealskin black. Functionally, the fence provides a barrier between the house’s back yard and the alley. Plus, the gate is eye-candy for the homeowners and for those who stumble across it alley-side. Additionally, the gate/fence design is historically appropriate for the neighborhood. It’s Galveston permitting office-approved! Next time you find yourself in Galveston, roll through the alley of the 1300 block of Winnie to see this piece up close and personal.  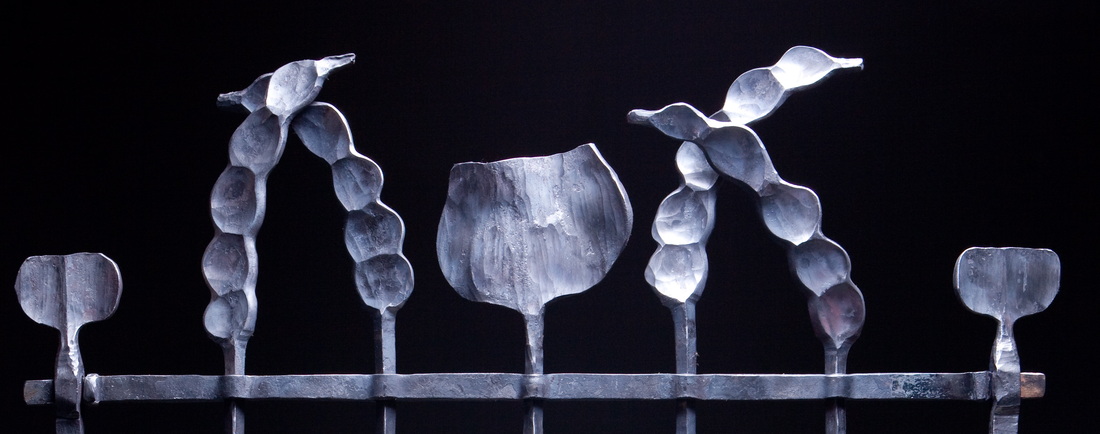 This garden gate contains examples of traditional joinery. There are no screws holding this piece together, nor has it been welded anywhere. I urge you to stop reading right now and just look at the pretty pictures. From here on out, the devil is in the details of how this piece came to fruition.
The top and bottom bars were slit and drifted on the diamond to the desired size, allowing the pickets to pass through. The tenons on the top and bottom bars fit snugly into the mortises of the stiles. Of course, the mortises were slit and drifted as well, and each tenon was exactly sized to fit through its mortise. To hold it all together, heat the ends and upset the metal. Now you’ve got a gate as solid as a World War II veteran’s reputation. Of course, prior to assembly, the metal stock had to be hammered into the desired shape/length/thickness, the frame had to be made square, the pickets et al. had to fit through their openings snugly but not too loosely, and on and on and on... I won’t go into all the gory details because, honestly, there are just too many to dwell on. The end result is attractive and speaks for itself (with far fewer curse words as the creating of it did!). The finished gate is about 32” wide and 40” tall from the bottom bar to the top bar. The pickets add another 8” or so to the height. This garden gate was a class project at Austin Community College in the ‘Powerhammer’ class. Each of us intrepid souls in the class made a basic frame as designed by the instructor, William Bastas. We were then encouraged to embellish the pickets with our own design. For my picket design, I opted for a stylized ‘pod’ theme reminiscent of seeds or beans. Art dies (also known as texturing dies) and ball dies were used to create the finials on each picket and the two stiles. Blacksmithing can transform metal stock from its original shape so drastically that it’s difficult to ascertain the shape of the original metal. For example: The middle picket started off life as a 12” long piece of 2” wide x 1” thick solid steel. The end result is a 40” long picket that’s 5/8” in diameter and is topped with a 6” wide x 4” tall finial. It’s as close to magic as I’m ever gonna get.
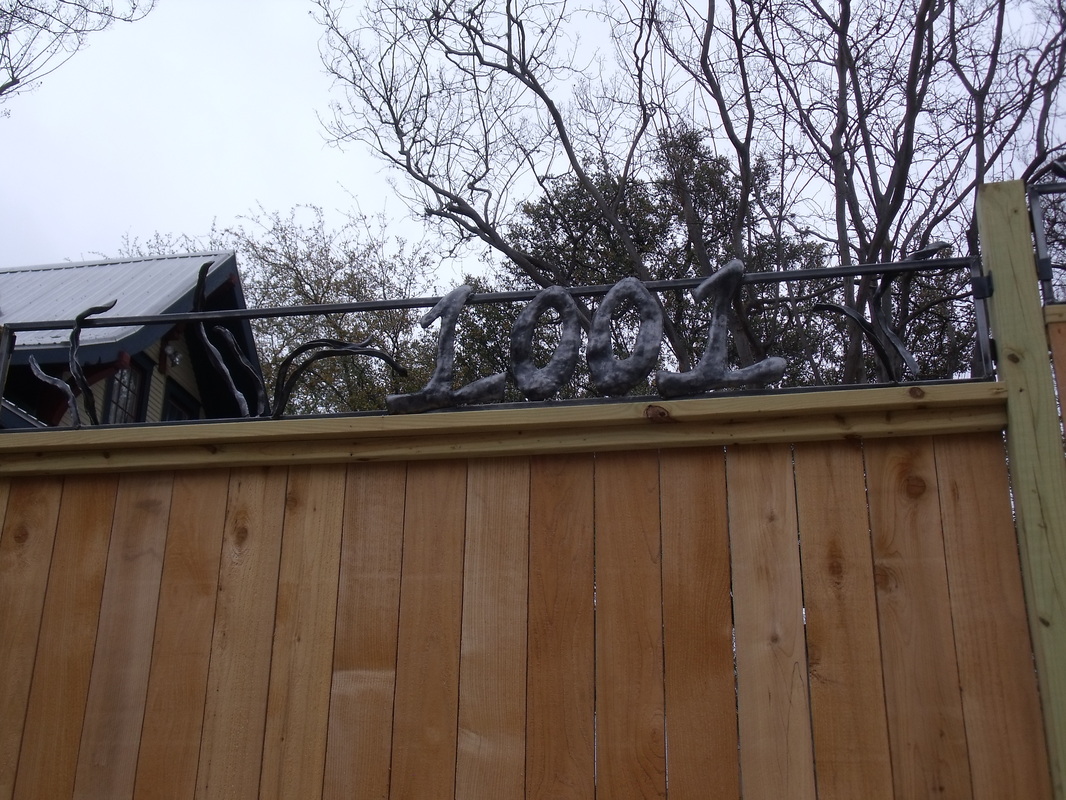
Gateway Guesthouse Bed & Breakfast, located at 1001 E. Riverside Drive at Travis Heights Blvd., is where this fence topper can be seen.
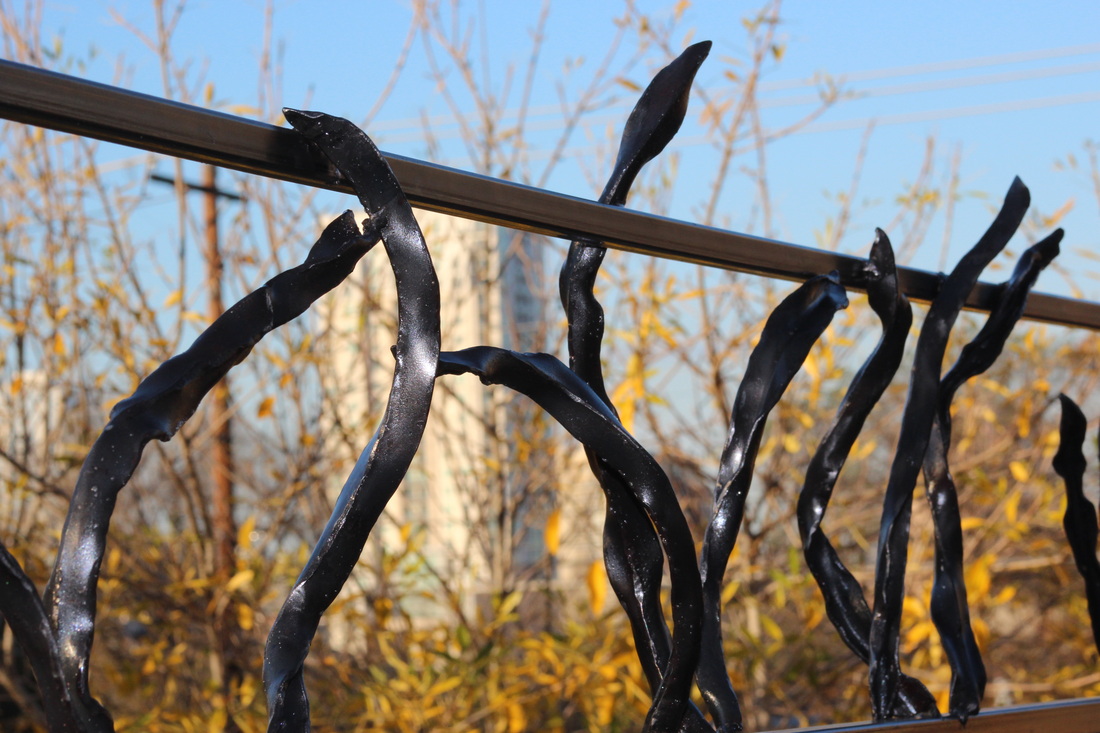
Along the west side of their property, the proprietors designed a wood privacy fence to accommodate a metal element atop the fence panels. I was fortunate enough to be referred for the project -- and even luckier to be chosen to make their vision come to fruition. The overarching goal was to incorporate a metal element which would compliment the backyard garden and landscaping. Various concepts were kicked around with the client, and it became evident that the desired look could only be accomplished via blacksmithing -- and lots and lots of it at that. So, of course, the only logical next step was to purchase a power hammer. And that’s how I ended up with a 25-lb. Little Giant Power Hammer originally manufactured in 1929 in Mankato, Minnesota. HOT TIP: When calling around for a tow truck company to remove your 900-lb. acquisition from the back of your pick up truck, be sure to ask specifically for “a conventional tow truck with extendable boom”. That type of truck is actually a pretty rare item nowadays. But I digress... After taking careful measurements on-site, I used square tubing to fabricate custom-size panels/frames. These frames were then adorned with 3/4”-angle iron of various lengths, having been worked on the power hammer to resemble oversized stalks of grass waving in the wind. It’s OK if you see undulating seaweed instead, there’s nothing wrong with that either. The end result is still lovely and wispy and fluid! I like that the stalks ‘escape’ the confines of their borders, making this fence topper element appealing to the eye from all angles, both street-side and from inside the yard. So please stop by for a look yourself next time you’re in the Travis Heights neighborhood. Or, better yet, book a room at the B&B and enjoy the view poolside... 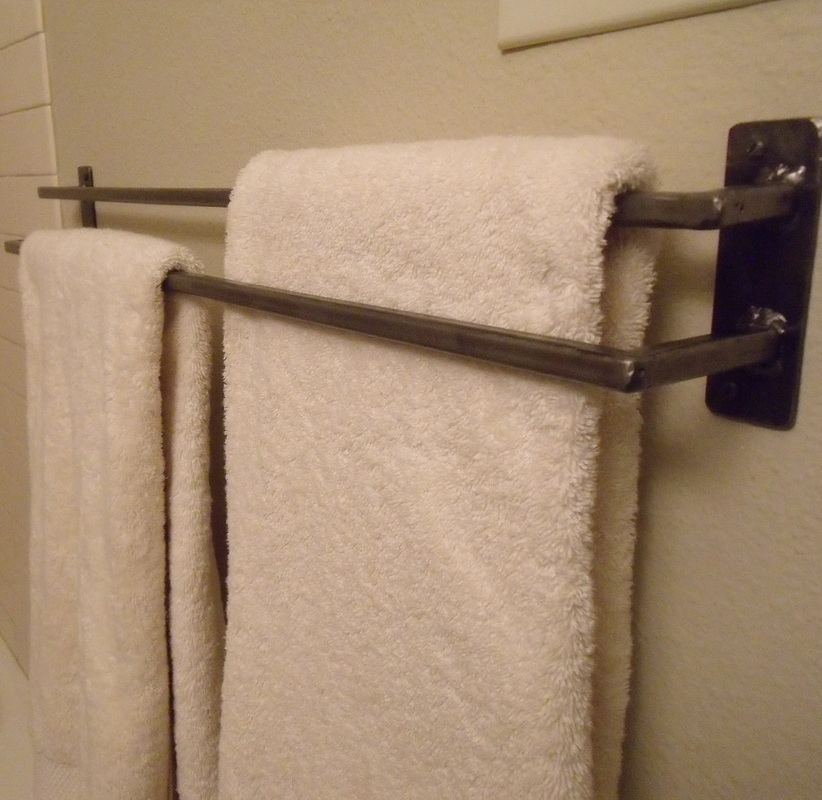 I think double towel bars are the bee’s knees. They’re the perfect space saver and look kinda cool to boot.
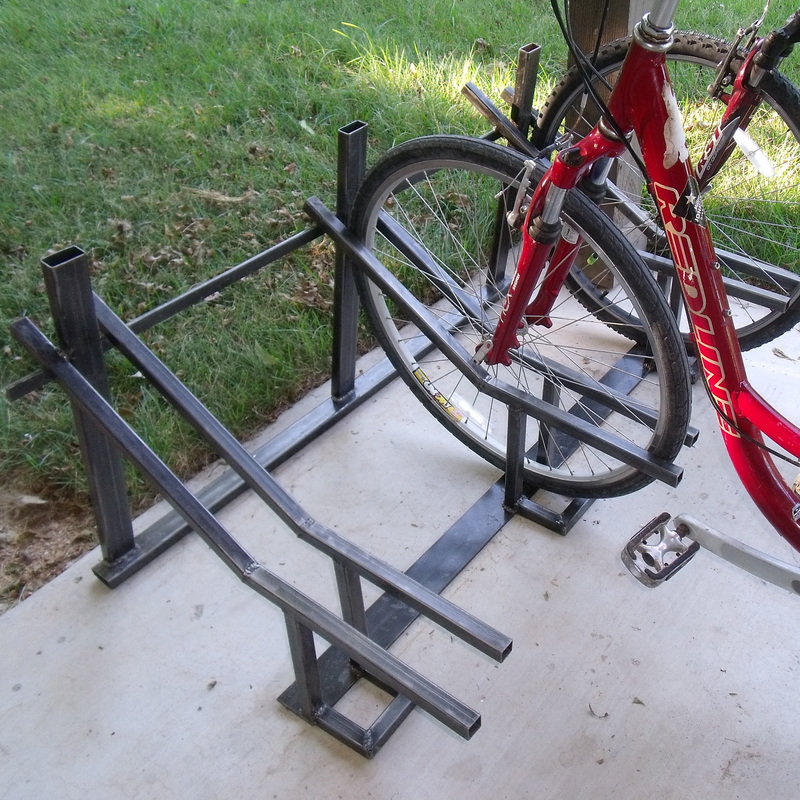
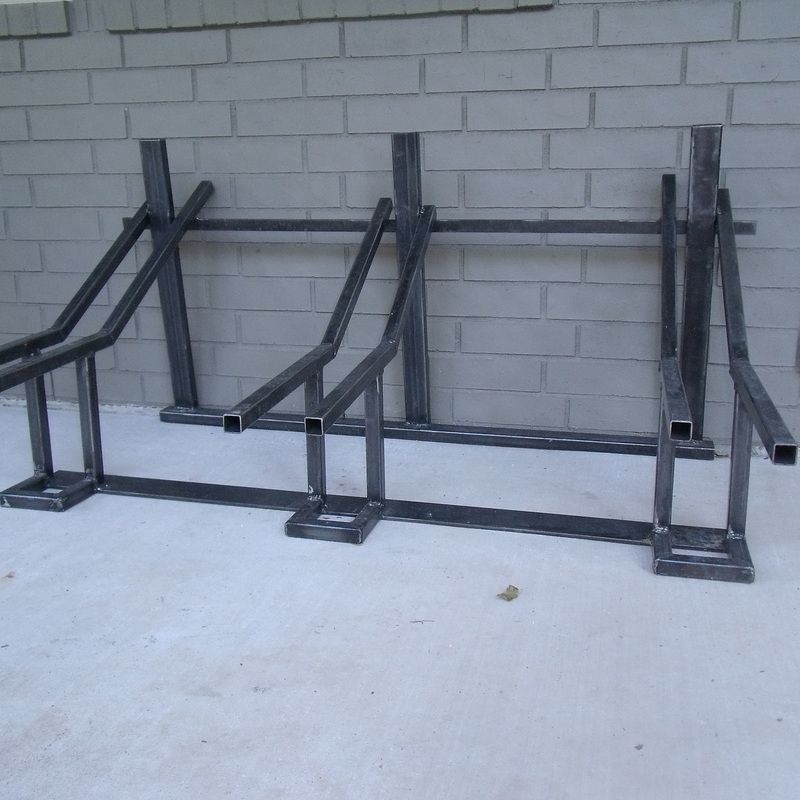
These can be made in any length to accommodate any space. This bar is 30” long and accommodates a full-size towel so that it doesn’t have to be folded in half. A bicycle rack built for three... a space for me, for Reed, and for a guest who happens to roll by on two wheels.
I designed and built this bike rack from tubing and strap, all put together with my handy-dandy wire feed welder. I’ve sealed it with a u/v resistant lacquer so that it won’t rust in the weather. In this case, the bike rack didn’t need to be bolted down. It’s light enough for one person (i.e., me) to easily move, yet sturdy enough to keep the bikes steady. At first, I got the dimensions all wrong and had to grind out all my welds and tweak my design. Then once I thought I was finished, a big wind storm came along and showed me that the bikes could roll out backwards and come crashing down on each other. So I added a modification: a little lip that stops the front tire from rolling backwards. That modification actually improved the form of the piece (in my opinion) as well as the functionality. Another happy accident. Of course, I cut the tubing at different lengths so that each of the three wheel corrals is a bit unique; I don’t like anything to be too uniform now, you know? And, oh yeah, one more thing: Cool houses sport bike racks out front!... 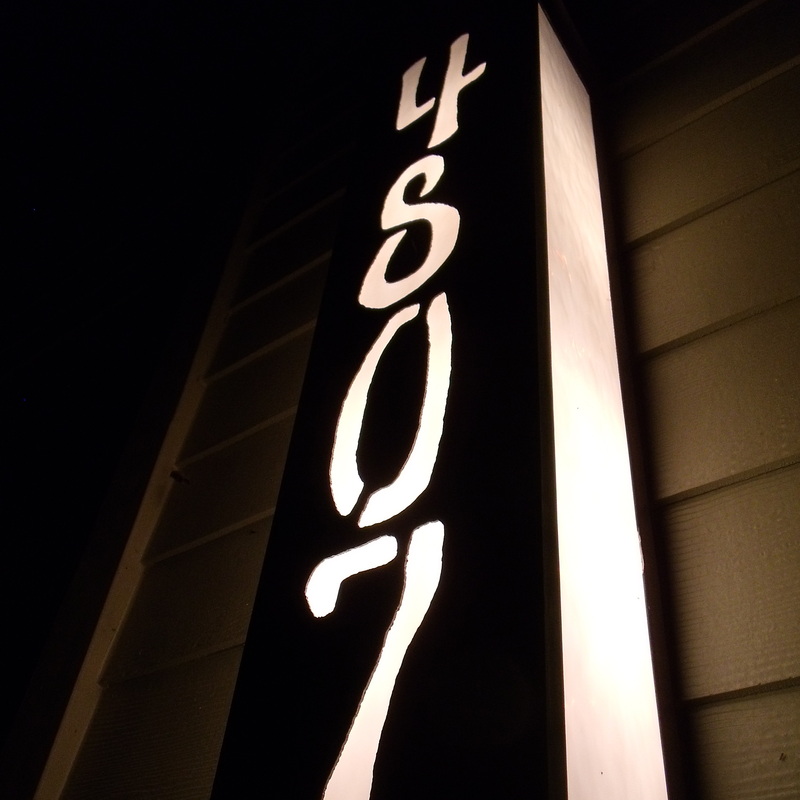 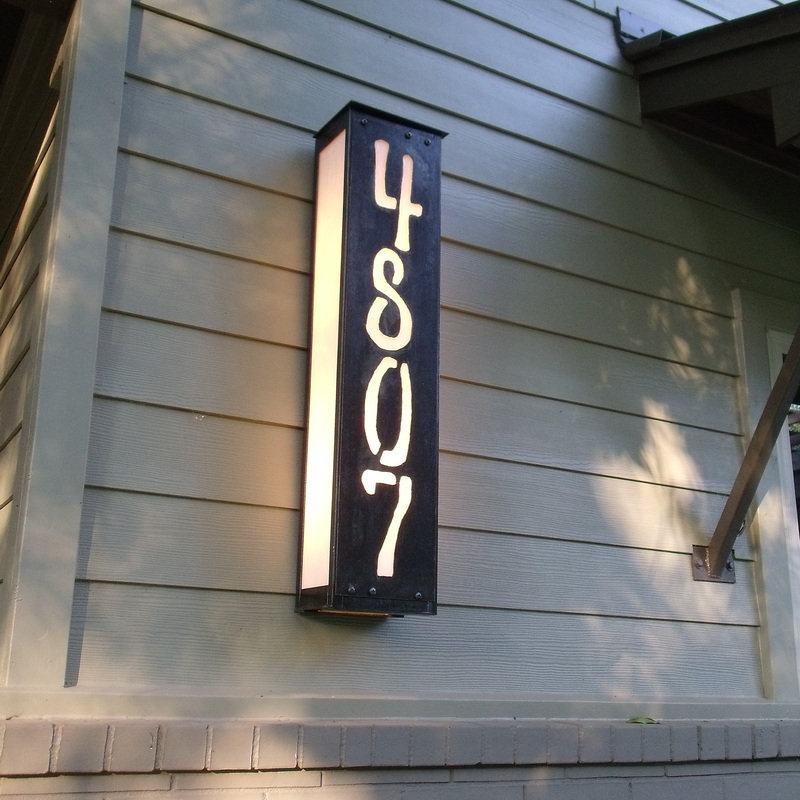 This steel-and-stained glass box reflects the house’s address. It’s also a light fixture, casting a soft, indirect glow when darkness arrives, illuminating the way from the pathway to the front door.
This particular fixture was designed for outdoor conditions (i.e., it’s waterproof). A custom grill with the house’s address number screws onto a steel cage. Stained glass nests in the sides and behind the front grill, creating indirect light that doesn’t blind you or your guests. Just say “No!” to glare. Bad lighting is one of my pet peeves, and I’m making it my life’s mission to snuff it out whenever possible. This type of fixture is suitable for home or commercial use, and the address (or a business’s name...) is readily visible come nightfall with the flick of a switch. 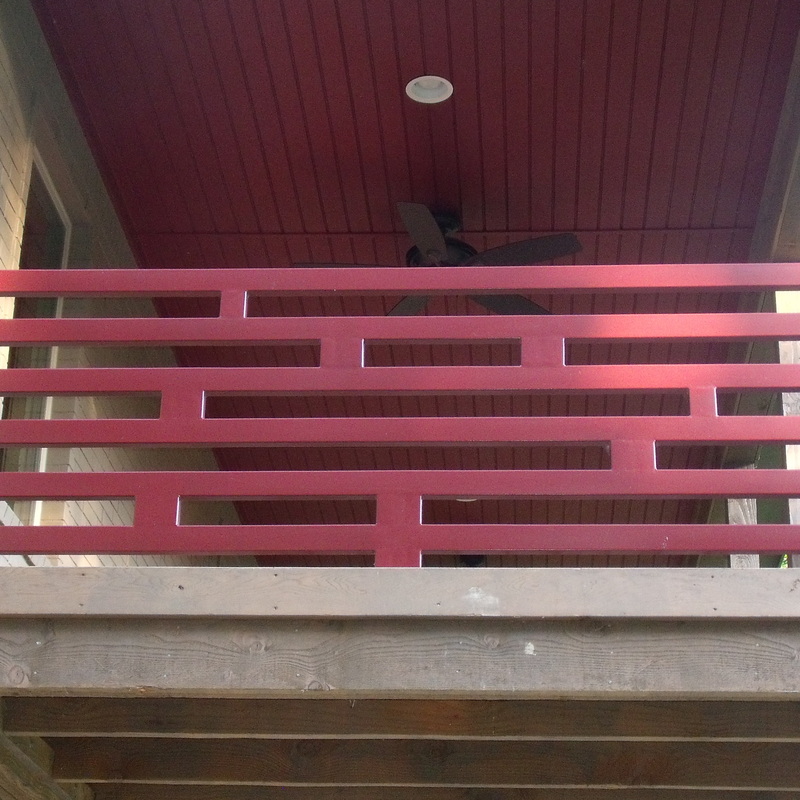 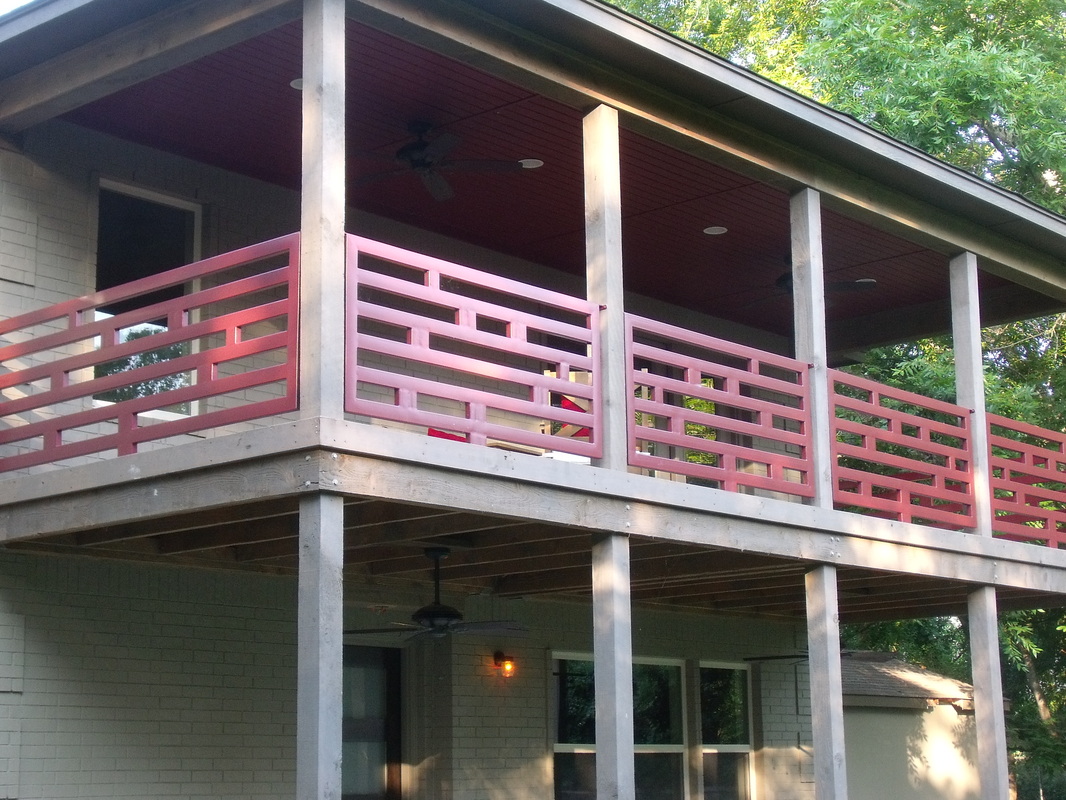 This balcony railing was designed by me and fabricated by Ernie’s Welding Shop here in Austin. I provided the shop drawings, and they built it to spec. They did beautiful, quality work.
While nailing down some details about the project, I met Ernie himself, talked a bit of shop, and weaseled my way into a tour of the place. The railings are made from tubing. I started off with a fairly complex design but kept simplifying to reduce cost (primarily labor). The end result remained true to the original intent of long, horizontal lines with a random yet balanced pattern. |


|
LAURAARMSTRONG.STUDIO
|
Copyright 2023 Laura Armstrong. All rights reserved.
|